
Mig-21M
Jugoslovansko vojno letalstvo, št. 805 - Yugoslav Air Force
Eduard 1:48

4. PODVOZJE (LANDING GEAR)
4.1. Podvozje spredaj - LANDING GEAR (front)

4.1. Podvozje spredaj - LANDING GEAR (front)

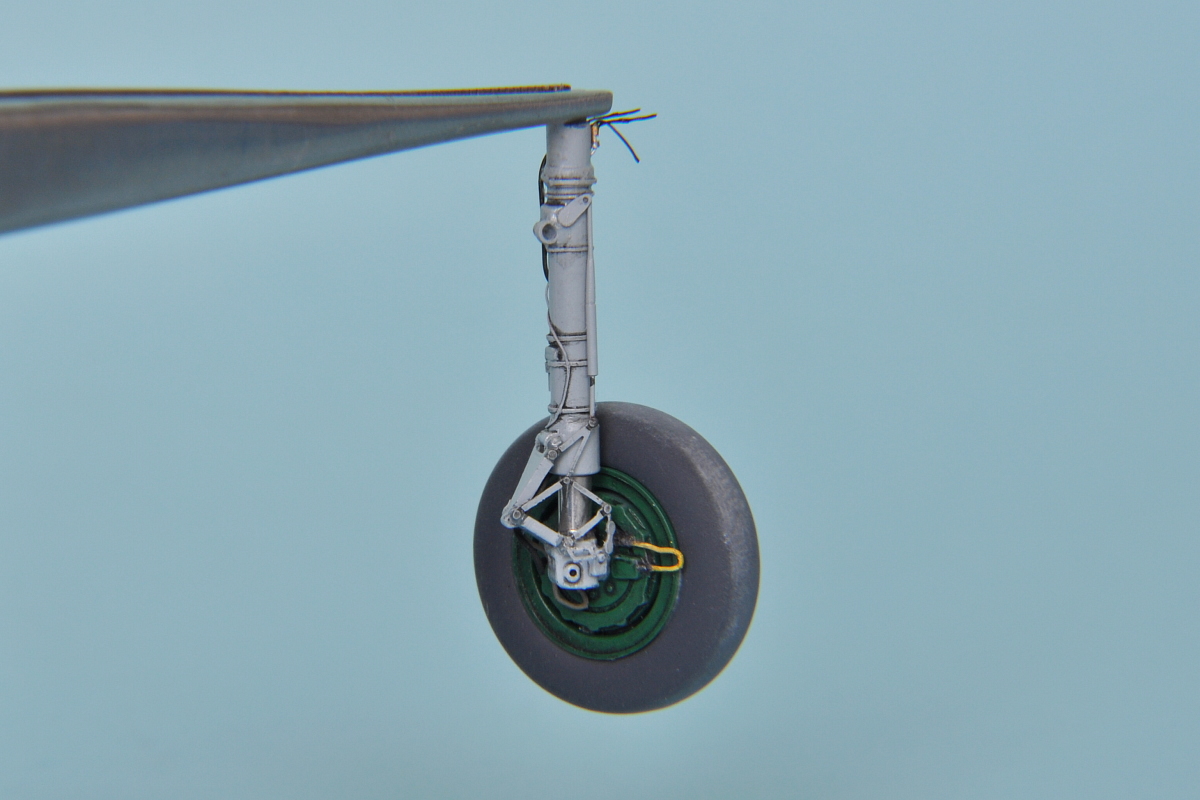
Na nogi podvozja D9 manjkajo nekateri detajli, ki zahtevajo samogradnjo. Iz aluminijaste pločevine so izdelane 3 objemke, del noge, ki je kromiran pa odrežemo in nadomestimo s kovinskim vsadkom. Tega izdelamo iz injekcijske igle 1,4 mm, ki jo zapolnimo z iglo 0,9 mm, za sam vsadek pa uporabimo iglo 0,5 mm.
On the leg of the gear D9, there are missing some of the details, wich must be scractbuilded. From alluminium sheet we can make 3 clamps, a part of the the leg wich is chromed we must cut and replace it with a metal implant from the hypodermic needle 1,4mm, wich can be filled with another needle 0,9mm and for the entire implant we can use 0,5mm needle.
On the leg of the gear D9, there are missing some of the details, wich must be scractbuilded. From alluminium sheet we can make 3 clamps, a part of the the leg wich is chromed we must cut and replace it with a metal implant from the hypodermic needle 1,4mm, wich can be filled with another needle 0,9mm and for the entire implant we can use 0,5mm needle.


Del D64 ima nakazane tri reže, ki pa bi morale biti izdolbene. V dodatkih ponuja Eduard ploščico št. 80, vendar je bolje da reže izdolbemo. Če nam to ne uspe, ploščico še vedno lahko uporabimo. Takoj nad delom D64 manjka še polkrožen detajl, ki ga izdelamo iz 0,2 mm debele plastike.
Part D64 has 3 lines wich should be carved in. In accessories Eduard offers you plate No80 but it's recommended if you carve the lines. If you fail you can still use original plates. Right above the part D64 is missing a half-circle detail wich we can make ourselves out of the 0,2mm plastic.


Oba hidravlična voda na nogi sta različnih debelin. Izdelamo jih iz bakrene žice 0,15 mm in svinčene žice 0,2 mm. Izdelamo še indikator olja, ki se nahaja na polovici noge na sprednji strani. Tudi vsi detajli na vilicah kolesa so samogradnja razen dela D55.
Both hydraulc circuit on the foot are made of different thickness. We can make them of copper wire 0,15mm and lead wire 0,2mm. We must make an oil indicator, wich can be found on the top half of the leg(front side). All wheel details were scratchbuilt except the D55 part.


In this phase we install a front part of the landing gear into wheels area. It's recommended to glue the landing gear before we glue together a whole body, because it's harder to install it once the body is glued together.


4.2. Podvozje zadaj - LANDING GEAR (back)


Najprej na obeh nogah podvozja (D78, D79) izdelamo vse objemke, hidravlične vode in priključke. Oba črna voda namestimo šele na koncu montaže. Kromirani del hidravlične noge izdelamo iz injekcijske igle 1,8 mm, za polnilo uporabimo iglo 1,4 mm, za vsadek pa iglo 0,9 mm.
First we must make all clamps, hydraulic circuits and connectors on the both wheel legs (D78, D79). We install the black circuits on the end of the build. Chrome part of the hydraulic leg we can made of hypodermic needle 1,8mm, for the filler 1,4mm and for the implant 0,9mm.


Hidravlični roki za uvlečenje podvozja (D5) sta pri Eduardu popolnoma enaki. Ko dodamo manjkajoče detajle pa se simetrično razlikujeta. Kromiran del hidravlične roke izdelamo iz injekcijske igle 0,9 mm.
Hydraulic hands (D5) are the same as Eduard's, but when we add a missing details, they are symetrically different. Chrome part of hydraulic arm is made of 0,9mm hypodermic needle.


Eduard ima v svojem kompletu jedkanih delov tudi dodatke. Hidravlične vode smo že izdelali sami iz žice, pravtako sami izdelamo del št. 11.
In Eduards package we can find parts aswell. Hydraulic circuits were already made, all we need to do is to make a part No11.

Uporabimo pa dela št. 52 in 53 takoimenovane "škarje". Na samih škarjah je odveč del označen z rdečo puščico, ki ga odrežemo. Ročica označena z modro puščico je prekratka, del ročice označene z zeleno puščico pa uporabimo. Samo ročico izdelamo iz injekcijske igle 0,5 mm in žice 0,15 mm, zoženje pa oblikujemo s kitom.
We use part 52 & 52 so called ''Scissors''. On the ''scissor'' theres a part signed with a red arrow wich must go away. Further the handle marked with blue arrow is too short, the part with green arrow is the good and we can use it. The handle can be made of hypodermic needle 0,5mm and wire 0,15mm. Narrowing of the handle can be made with putty.


Za oplato na hidravličnih nogah uporabimo jedkane dele.
For planking on the hydraulic legs we can use PE parts.


Za upogibanje delov št. 13 in 14 je dobro imeti primerno orodje.
For bending the parts 13 and 14 it's recommended to have proper tools.


Na zunanji strani oplate je potrebno vgravirati še polkrožno linijo. To je del oplate, ki se odstrani v primeru da je letalo oboroženo z večcevnim raketnim lanserjem.
On the outside of the planking we must carve a hemispirical line. This is the part of the planking that can be removed when the aircraft was loaded with a rocket launcher.


LEVA NOGA - Left Gear :


DESNA NOGA - Right Gear :


Kompletna delavnica (Detailed Workshop here):